Click Here to Subscribe and receive a Free Bonus Pattern


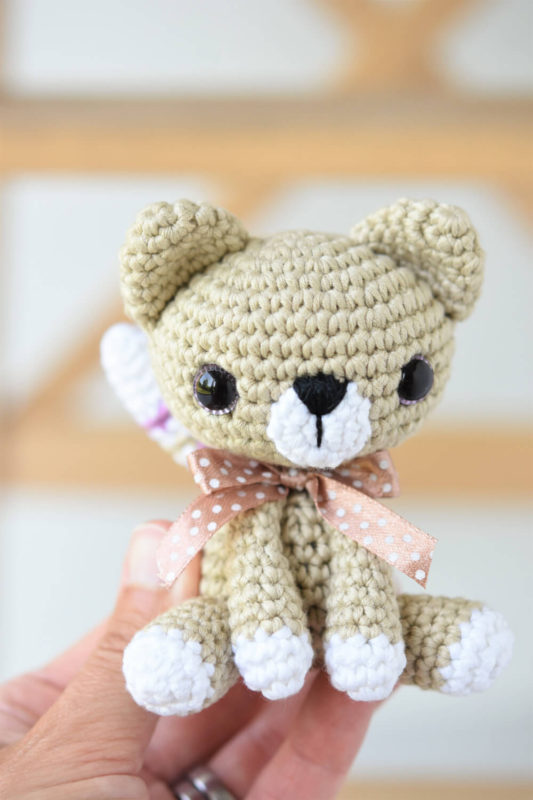
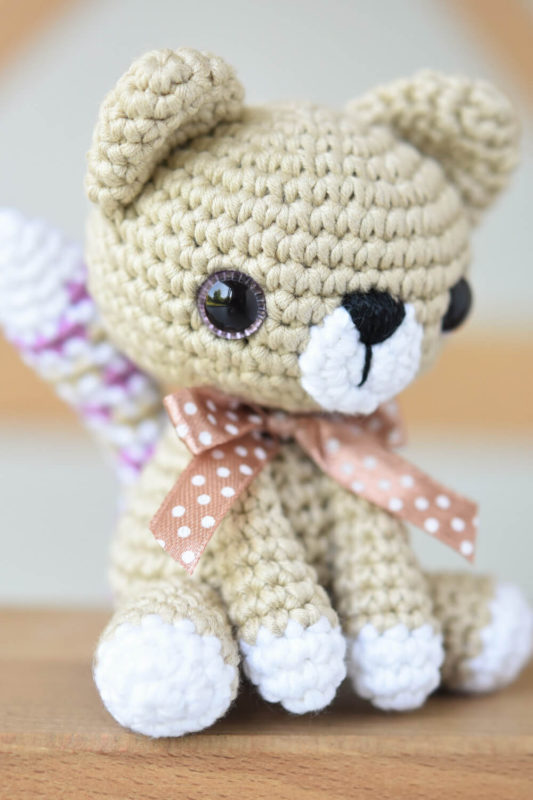
LITTLE AMIGURUMI KITTY
Free pattern © Mari-Liis Lille
Little amigurumi kitty is in sitting position and has a cute striped tail. It was the very first pattern I ever wrote and is therefore very dear to me.
You can also purchase an inexpensive downloadable PDF pattern with photos to guide you through the process.
Disclosure: Some of the links below are affiliate links, meaning, at no additional cost to you, I will earn a commission if you click through and make a purchase.
Supplies:
- DK weight cotton yarn in 3 colors (I chose beige, write and purple), for example Katia Bamboo (50g / 100m; 60% bamboo, 40% cotton) or Drops Muskat (50g / 100m; 100% cotton)
- Crochet hook 2.5 mm
- Polyester fiberfill
- Safety eyes (Ø 10 mm)
- Black cotton thread
- Satin ribbon
- Tapestry and embroidery needle
Finished size: 9-10 cm / 4 in
Skill level: easy
Stitches needed (US crochet terms):
Slip stitch (sl st), chain (ch), single crochet (sc)
About the pattern:
- Work in continuous rounds. Do not join or turn unless otherwise instructed.
- Use a stitch marker and place it in the first stitch of the round to mark the beginning of it.
- Leave each piece a long tail for sewing.
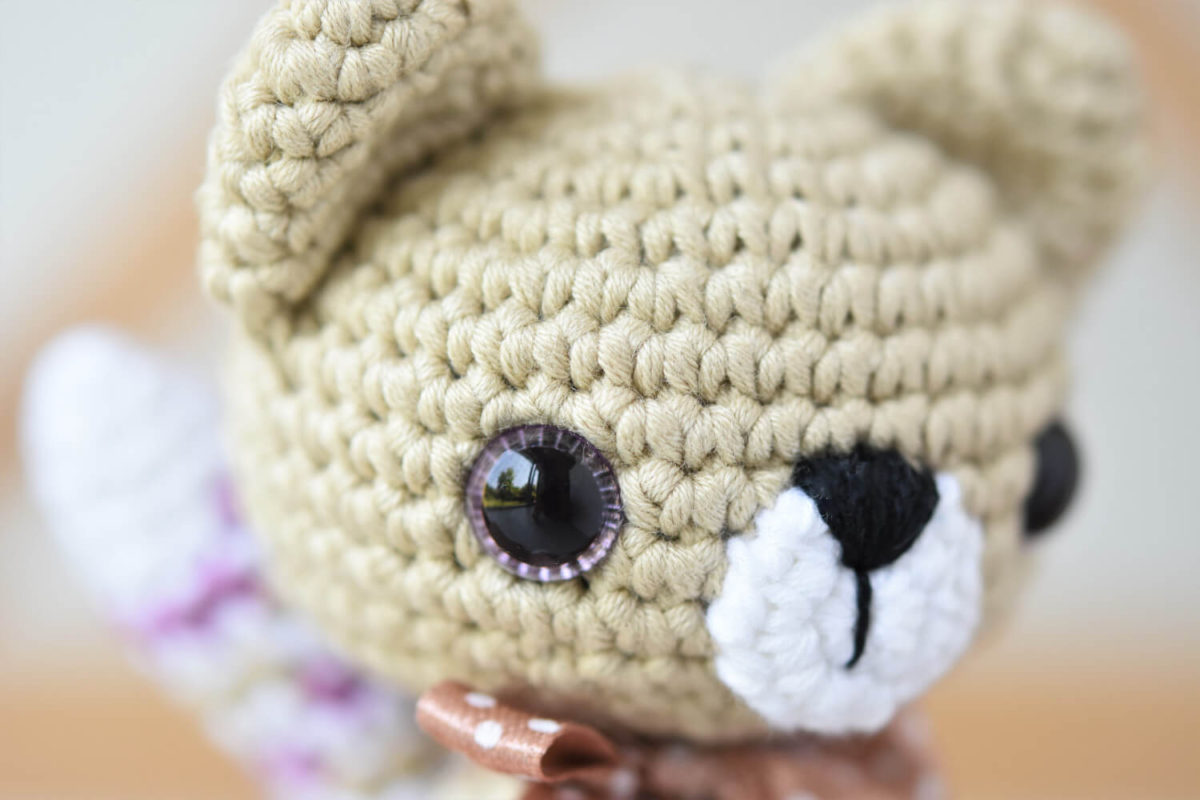
HEAD
Crocheted from top to bottom.
1: Color A. Start 6 sc in a magic ring [6]
2: Work 2 sc in each st around [12]
3: (Sc in next st, 2 sc in next st) rep 6 times [18]
4: (Sc in each of next 2 sts, 2 sc in next st) rep 6 times [24]
5: (Sc in each of next 3 sts, 2 sc in next st) rep 6 times [30]
6: (Sc in each of next 4 sts, 2 sc in next st) rep 6 times [36]
7: (Sc in each of next 5 sts, 2 sc in next st) rep 6 times [42]
8-12: Sc in each st around
13: (Sc in each of next 5 sts, sc2tog) rep 6 times [36]
14: (Sc in each of next 4 sts, sc2tog) rep 6 times [30]
Fasten safety eyes between rounds 10 and 11. Insert the first eye, then count 9 holes to the left and insert the second eye in the next hole. Close the washers.
Fill the head with fiberfill and add stuffing as you go.
15: (Sc in each of next 3 sts, sc2tog) rep 6 times [24]
16: (Sc in each of next 2 sts, sc2tog) rep 6 times [18]
17: (Sc in next st, sc2tog) rep 6 times [12]
EAR (make 2)
1: Color A. Start 6 sc in a magic ring [6]
2: (Sc in next st, 2 sc in next st) rep 3 times [9]
3: (Sc in each of next 2 sts, 2 sc in next st) rep 3 times [12]
4: Sc in each st around
5: (Sc in each of next 3 sts, 2 sc in next st) rep 3 times [15]
5: Sc in each st around
Sew the ears to the head.
MUZZLE
1: Color B. Start 6 sc in a magic ring [6]
2: Work 2 sc in each st around [12]
Sew the muzzle on the face. Embroider the nose with black thread.
BODY
Crocheted from the bottom up.
1: Color A. Start 6 sc in a magic ring [6]
2: Work 2 sc in each st around [12]
3: (Sc in next st, 2 sc in next st) rep 6 times [18]
4: (Sc in next 2 sts, 2 sc in next st) rep 6 times [24]
5: (Sc in next 3 sts, 2 sc in next st) rep 6 times [30]
6-7: Sc in each st around
8: (Sc in next 3 sts, sc2tog) rep 6 times [24]
9: Sc in each st around
10: (Sc in next 6 sts, sc2tog) rep 3 times [21]
11: (Sc in next 5 sts, sc2tog) rep 3 times [18]
Stuff the body and add stuffing as you go.
12: (Sc in next 4 sts, sc2tog) rep 3 times [15]
13: (Sc in next 3 sts, sc2tog) rep 3 times [12]
Sew the head and body together.
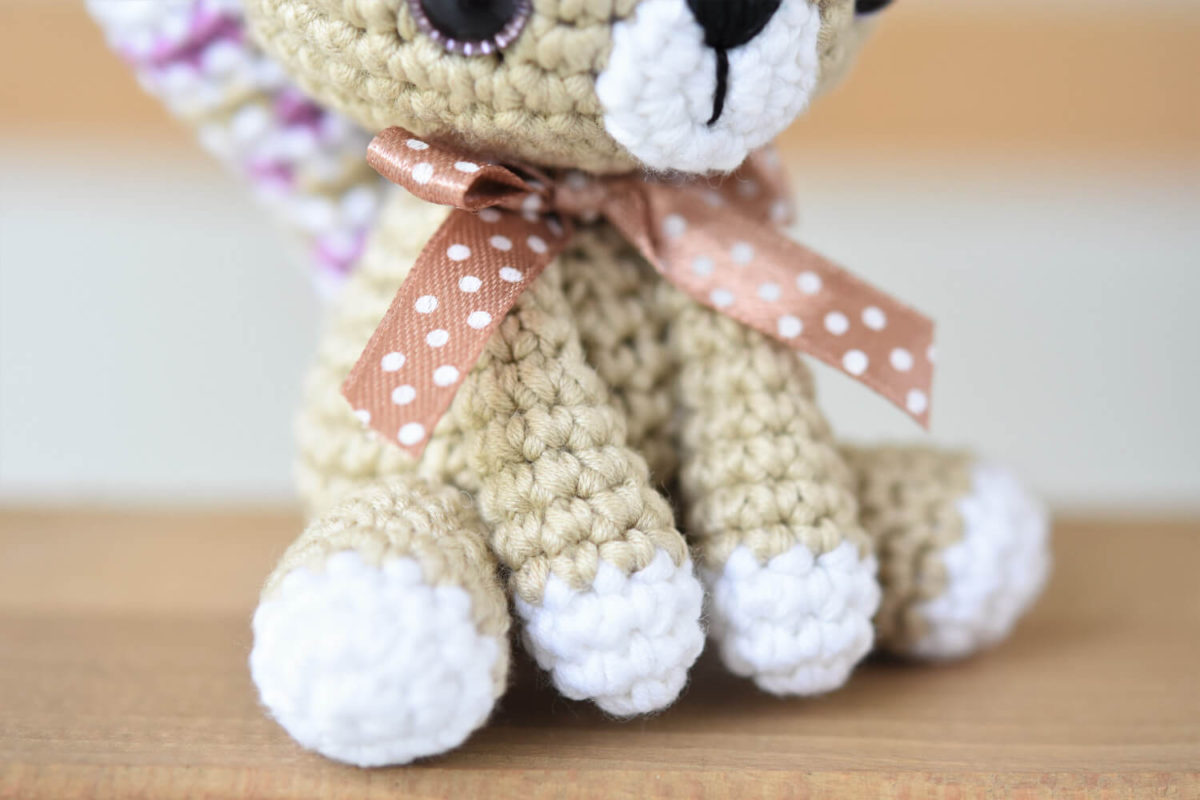
LEG (make 2)
1: Color B. Start 6 sc in a magic ring [6]
2: Work 2 sc in each st around [12]
3: Sc in each st around
4-8: Color A. Sc in each st around
Fill the tip of the leg.
9: (Sc in next 2 sts, sc2tog) rep 3 times [9]
Sew the legs to the body in sitting position, so that your kitty can nicely lean on them.
ARM (make 2)
1: Color B. Start 6 sc in a magic ring [6]
2: (Sc in next st, 2 sc in next st) rep 3 times [9]
3: Sc in each st around
4-6: Color A. Sc in each st around
Fill the tip of the arm.
7: Sc in next 7 sts, sc2tog [8]
8: Sc in each st around
9: Sc in next 6 sts, sc2tog [7]
10: Sc in each st around
11: Sc in next 5 sts, sc2tog [6]
12: Sc in each st around
Sew the arms quite to the front, between the head and body.
Attach the arms with a few stitches to the body to keep them in place.
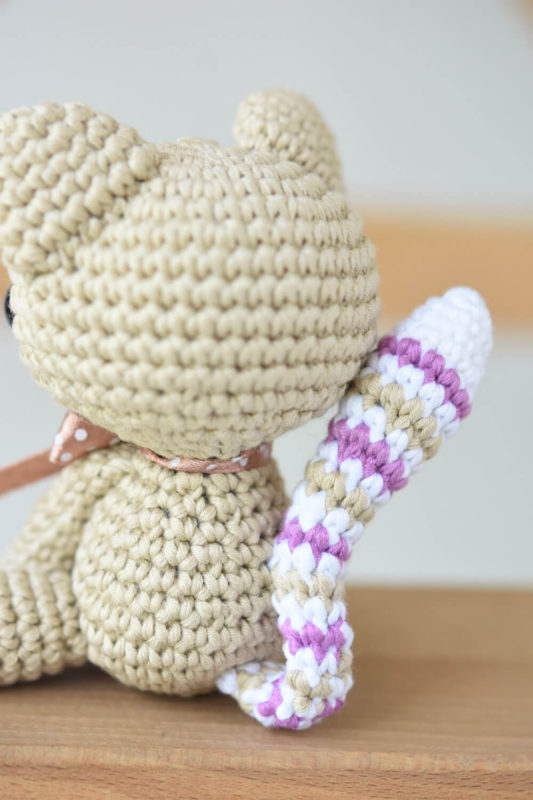
TAIL
1: Color B. Start 6 sc in a magic ring [6]
2: Sc in each st around
3: (Sc in next st, 2 sc in next st) rep 3 times [9]
4: Sc in each st around
5: (Sc in next 2 sts, 2 sc in next st) rep 3 times [12]
Hereafter alternate color every round in the following sequence: color C (purple), color B (white), color A (beige), color B (white).
6-8: Sc in each st around
9: Sc in next 5 sts, sc2tog, sc in next 5 sts [11]
10: Sc in next 9 sts, sc2tog [10]
Stuff the tail and add stuffing as you go.
11: Sc in next 4 sts, sc2tog, sc in next 4 sts [9]
12: Sc in next 7 sts, sc2tog [8]
13: Sc in each st around
14: Sc in next 3 sts, sc2tog, sc in next 3 sts [7]
15-25: Sc in each st around
Sew the tail to the body and attach it with some stitches somewhat higher as well to keep it upright.
Tie a ribbon around the neck and you`re done!