

Tips and tricks
How to join amigurumi pieces?
Feb
People have asked for so many times “How do you join amigurumi pieces?”, “How do you sew the toy together?”. Obviously it is one of the most complicated things for beginners and it takes time to find your own way to do it. I have found mine, but it was a long way and a lot of experimentation.
I have created a versatile tutorial of two different ways to sew pieces together at the same time showing how to attach different types of pieces. Hopefully it will help some of you, who you are stucked in this issue. One method might suite some of you, the other method might be more comfortable for others. There is no right and wrong in crochet, it`s just the matter of how it`s best for you.

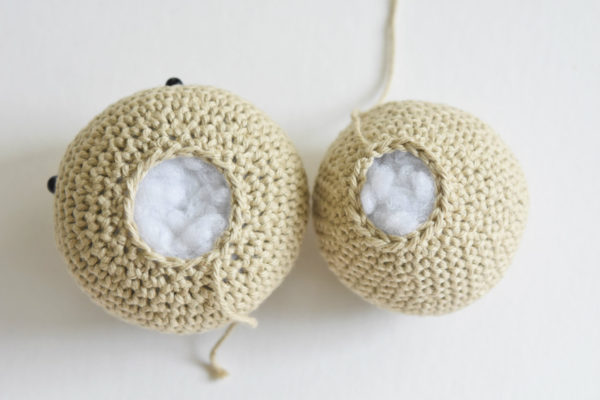
Please note! It`s good to leave a long tail of yarn in the end of each piece for sewing. This makes it much easier. I used contrasting color of yarn and didn`t tighten the seam to make it easier for you to understand. Using the right color of yarn and tightening the seam correctly will make it much more unnoticeable.
Let`s get started!
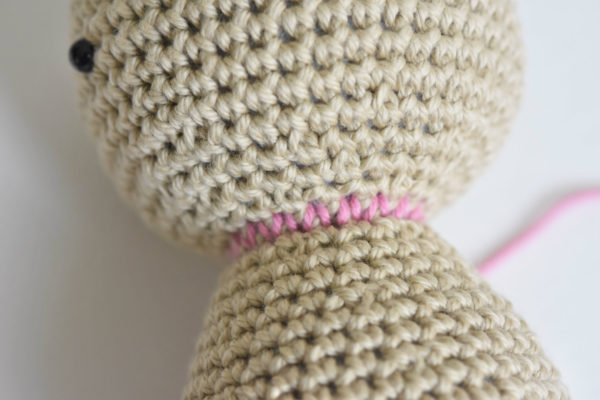
JOINING WITH VERTICAL STITCHES
Connecting two open pieces
1. Insert the needle vertically between the stitches of the first open piece (head). This means you`ll go around the post of the stitch, from right to left. Draw the yarn through.
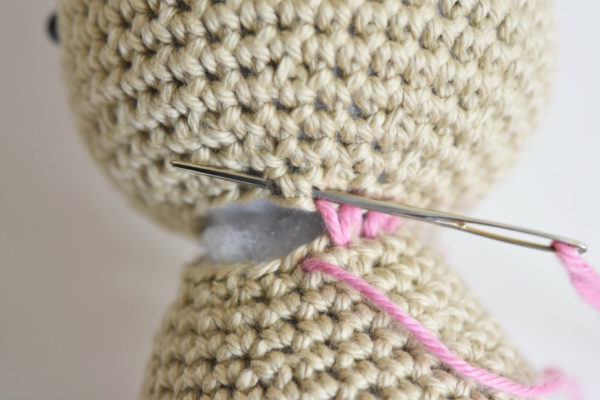
2. Now insert the needle between the stitches of the other piece (body), just where the two pieces touch. Again, draw the yarn through.
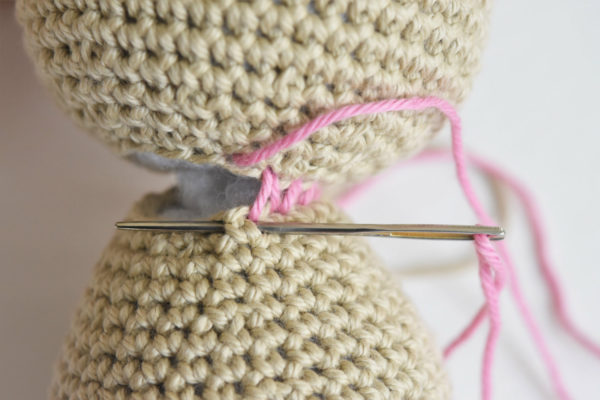
You have finished one joining stitch. Repeat the same until you have worked the entire round.
You don`t need to pull the yarn very tight, but enough from keeping the stitches being loose. If you are using the yarn in the same color as the pieces, the seam will fuse with the rest of the surface and will become almost invisible.
JOINING WITH HORISONTAL STITCHES
Connecting open piece to a closed piece
1. Insert the needle horisontally between the stitches on the open-ended piece (leg). This means you`ll bring the needle through the little hole between the two stitches. Draw the yarn through.
2. Now insert the needle between the stitches on the closed piece (body), just where the two pieces touch. Draw the yarn through.

Repeat the process till you have joined all stitches on the open-ended piece.
You will get another kind of the seam, but when made using the same color as for the pieces and tightened enough it will become almost invisible.
And that`s the whole mystery :) I hope some of you find this tutorial helpful.
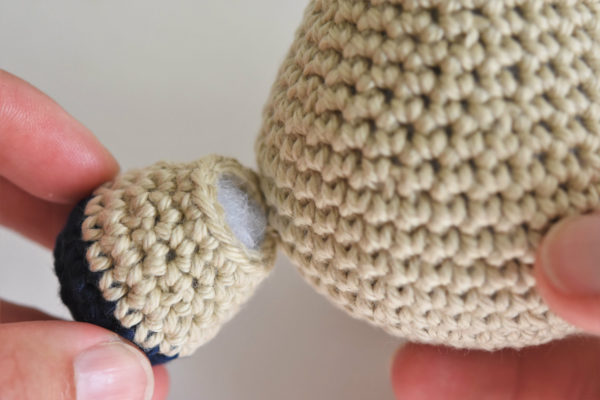
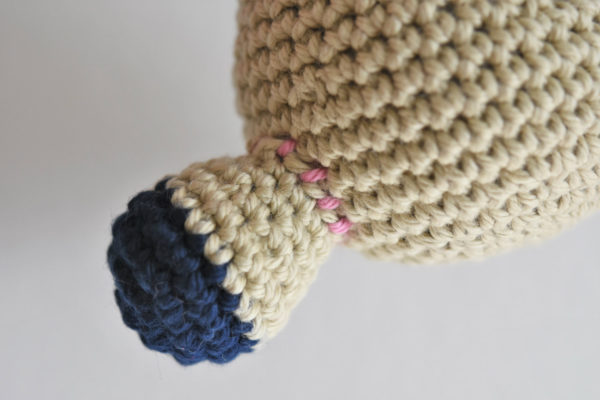
JOINING WITH STICK THROUGH METHOD
Connecting seamed piece to a closed piece
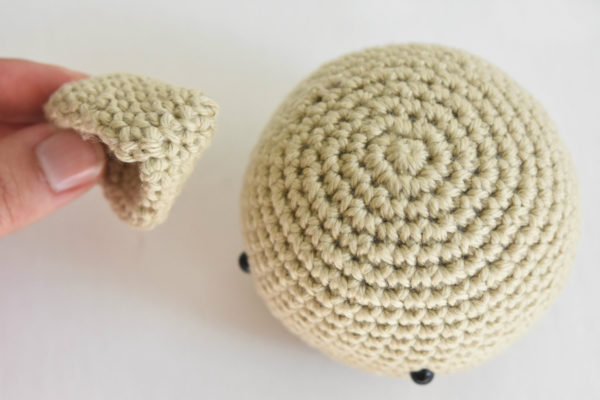
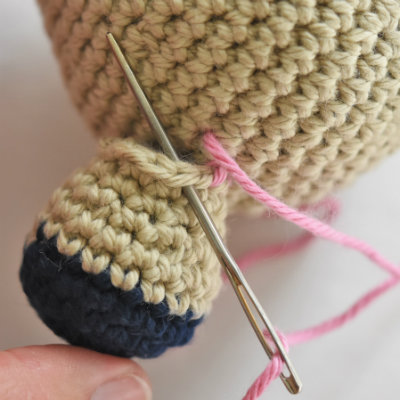
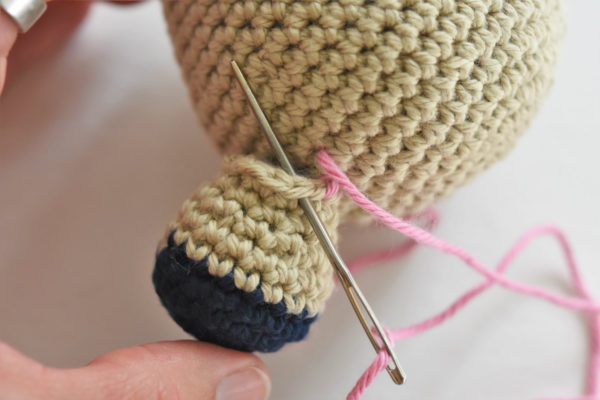
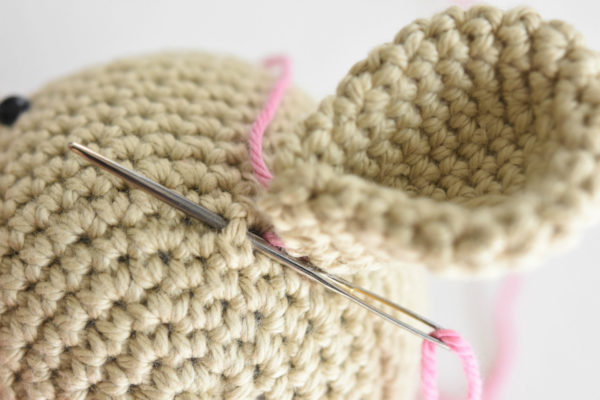
1. Insert the needle through the seamed piece (ear) using the stitches above the seam. Draw the yarn through.

2. Now insert the needle between the stitches of the closed piece (head), just where the two pieces touch. Draw the yarn through.
pourrais-je avoir le tuto de “lill tecca” petit bonhomme rappeur ?.MERCI BEAUCOUP
c’est très intéressant et il y a beaucoup d’aide, j’aime beaucoup comment coudre les pièces entre elles.
Merci infiniment
I don’t know who you are but I LOVE YOU !!!! You have made me enjoy sewing body parts together thank you thank you for you your tutorial is perfect
I agree. So thankful I found this website
Hey , hartelijk dank om deze nuttige informatie te willen delen met ons 👌👍💛
Takk
How do you sew a muzzle on to a face. I am working on the sock monkey and I am not sure the best way to attach the muzzle.
Here is a tutorial post about sewing parts together. Both the head and muzzle are left open.
The muzzle is sewn to the head with “Connecting an open piece to a closed piece” technique. The head and the body are sewn together as two open pieces.
How do you knit it off and cut ?
My biggest struggle is attaching
TOP TIPS FOR SEWING LIMBS TO BODY – When sewing a stuffed head to body I found gently putting a few knitting needles through both parts really help to keep it in place. Another tip, if you have made a toy with plush/velvet yarn I found it difficult sewing the limbs to the body with this yarn so instead I use eg an Aaron or chunky yarn matching the main colour as close as I could. Bingo 👍😝
Yes, those are very helpful tips.
Is there a tutorial showing how to join the feet to the Sleepy Owl. I’ve completed each foot (adorable) but can’t figure out how to sew them to the bottom of the body. Are they supposed to hang from the body? This is my fifth amigurumi stuffed animal and I am having such a blast. Thanks in advance for your help. – Kat
Hi, Kat! Yes, the legs will hang. Use the open part to sew them to the body, similarly to the second example in this post (joining with horizontal stitches).
Hvala vam puno,muku sam mucila oko spajanja zatvorenog i otvorenog dela bas ste mi pomogli
I´m so glad to hear this!
These tips and tricks were soooo helpful. I’ve crocheted for years but just recently took up arigurumi. The sewing part drives me crazy. LOL. One tip I’d like to share that I created by myself today is how to hold heads to bodies, etc. until you can sew around the pieces. Pins. stitch markers etc. would just fall out before I ever got to them. But hey, I had some fairly long leftover yarn of varying colors. So I threaded my needle with one of those pieces, put it through the two pieces I wanted to attach, and made a bow. (Hence the need for longer pieces of yarn.) I just spaced the out around the area I needed to sew, didn’t need to be perfect on the placement, and untied the bows as I got to them. Since there is no knot at the bottom of the bow I just use my needle and release the two ends, pull the yarn out, and voila. I hope this helps other sewing frustrated people.
This is an awesome trick!!!! Thanks so much for sharing this with the rest of us!
Thanks, the floppy head article came at the perfect time!
Thank you for the fantastic photos that accompany your clear instructions. Can’t tell you what a difference it makes to have great photos. It gives you confidence & enjoyment to work on a new craft
Thank you so much for this feedback! I appreciate it a lot.
Thank you so much for sharing this information. I love making your designs. I must admit, dewing up is my pet hate but, I am getting better! Using these guidance photos will be very useful in future projects. ❤❤❤❤
Thank you. I was wanting to improve my sewing technique. This just fits the bill.
Obrigada! Muito obrigada! Excelente tutorial! Me ajudou muito!
Muchas gracias
Buenos Aires. Argentina
I needed to see this about 2 hours earlier! I crocheted my niece a fish, but had to guess at how to actually attach them. It worked, but could’ve been better. Bookmarking this page for future reference
I´m glad you finally found it! You can start a new amigurumi project right away to practice the techniques :)
Thank you so much for your free tutorial, i will be using it to sew my pieces together in future
Ty. I’m attempting my first amurigami. I’m sure this will help.
I have been trying to figure out how to sew the pieces together on my own. Thank you so very much for this tutorial.
Omg, this is what I’ve been looking for. I always end up being unhappy with the way its looks when I join the pieces, but I will have to try this!
The pattern I am using is for a Teddy Bear. The pattern states that I have to stuff each piece and use my tail to sew each piece together. So I don’t have a tail to attach each piece to the body. I have tried 3 times to make this bear. I am just wasting yarn. I sewed the pieces together as the pattern said. That didn’t help me at all. Then I whipped stitch each piece closed. Either way, attaching the pieces to the body looks horrible. I was told to pin the pieces onto the body. However, I can’t seem to get the pieces to stay. Any suggestions? I really want to learn how to do this. The crocheting part is easy.
Hi, Tammy! Even if you sew the pieces together, you can still use the remaining yarn tail for attaching the piece to the body. Is it any of my patterns you are using? I didn`t quite get it…
Thank you. Always handy to know better ways of doing things.
Thank you so much! I just finished a dog for a friend’s gift and couldn’t attach the body parts very well. Now I know and it will be perfect the next time. Thanks again!!
I´m glad if this post helps you!
I’d love to see a tutorial on how to crochet the ballerina kitty’s tutu onto her body!!
A detailed explanation with photos on how to crochet a skirt to the body is included in the pattern :)
Thanks for that – really helpful. My main issue is I either over or understuff. When it says stuff firmly I’m never sure how much is enough.
Thank you for these tips!! Do you have any tips for joining a head to a body so that the head is not floppy!! I’ve made lots and lots but some designs on some animals I can’t get the head to be more secure and not wobbly ????
I do have such tutorial :) Click here.
I really liked your tutorial. I’m glad you made it, because it has helped me tremendously.
I couldn`t expect a better feedback. Thank you!!!